Agarose Gel Electrophoresis
Introduction:
Agarose gel electrophoresis is an easy way to separate DNA fragments by their sizes and visualize them. It is a common diagnostic procedure used in molecular biological labs.
Electrophoresis:
The technique of electrophoresis is based on the fact that DNA is negatively charged at neutral pH due to its phosphate backbone. For this reason, when an electrical potential is placed on the DNA it will move toward the positive pole:

Dig. 1
The rate at which the DNA will move toward the positive pole is slowed by making the DNA move through an agarose gel. This is a buffer solution (which maintains the proper pH and salt concentration) with 0.75% to 2.0% agarose added. The agarose forms a porous lattice in the buffer solution and the DNA must slip through the holes in the lattice in order to move toward the positive pole. This slows the molecule down. Larger molecules will be slowed down more than smaller molecules, since the smaller molecules can fit through the holes easier. As a result, a mixture of large and small fragments of DNA that has been run through an agarose gel will be separated by size. This is a graphic representation of an agarose gel made by "running" DNA molecular weight markers, an isolated plasmid, and the same plasmid after linearization with a restriction enzyme:
These gels are visualized on a U.V. trans-illuminator by staining the DNA with a fluorescent dye (ethidium bromide). The DNA molecular weight marker is a set of DNA fragments of known molecular sizes that are used as a standard to determine the sizes of your unknown fragments.
If you click on the figure you will see a short movie that simulates the movement of the DNA bands through the gel. When looking at the video, note that bands of a low molecular weight move very quickly through the gel while high molecular weight bands move very slowly.
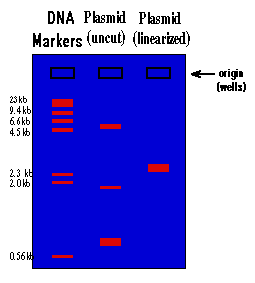
Dig. 2
Interpretation:
Much information can be derived from this gel. As you read the text below,
1.) By looking at the migration of the DNA molecular weight standards, you can tell that the migration of DNA through an agarose gel is not linear with respect to size. If you graphed the distance traveled vs. the molecular weight of the fragment, you would see that there is a logarithmic relationship (i.e. small fragments travel much faster than large fragments).
2.) You can see that there is a big difference between the way a plasmid as isolated from the alkaline lysis prep will run vs. this same plasmid after it is cut with a restriction enzyme and linearized. This is because the plasmid will be found in many different supercoiled forms in the bacteria. When you isolate plasmid from a bacterial culture, you isolate all the different supercoiled forms of the plasmid, and each will migrate differently on the gel, giving you three major bands and many minor bands. When this mixture of supercoiled plasmids is cut with a restriction enzyme, the different forms linearize and unwind. As a result they all become identical and run at the same rate, and you see only one band on the gel.
3.) The molecular size of an unknown piece of DNA can be estimated by comparison of the distance that it travels with that of the molecular weight standards. This is only true for linear DNA. None of the supercoiled forms will migrate at a rate relative to linear DNA, which means that you can't use the DNA markers to estimate the molecular weight of a circular DNA molecule. To estimate the molecular weight of a plasmid, you must first linearize it. By looking at the gel above, the molecular size of the plasmid can be estimated at approximately 3.0 kilobases (kb). A more accurate estimate can be found by graphing the molecular weight of the standards (in base pairs) vs. the distance traveled on semi-log paper and using this graph to determine the molecular weight of the unknown. You will do this at the end of this experiment. Molecular size is the most important information derived from the agarose gel and the usual reason for running a gel.
In this experiment, you will linearize the plasmid that you isolated last week with a restriction enzyme. Then you will run this linearized plasmid on an agarose gel with the uncut version and a DNA marker to determine the size of your plasmid + insert, which will give you an estimate of the size of your insert.
Procedure:
1.) Put together the following reaction mixture for the restriction digestion:
14.5 ul water
2.0 ul 10X Rest. Enzyme buffer
3.0 ul plasmid DNA solution (from last week)
0.5 ul Restriction Enzyme (eg., HindIII)
20.0 ul Total
Add the enzyme last, and always keep it on ice. The enzyme you will use will depend on the plasmid that you have, and will be told to you during class. 0.5 ul can't be measured with your pipetman. You must estimate it by the way it will look in the pipet tip (instruction will be given in class). Be sure to use a clean tip when taking the enzyme out of the tube. Put this reaction at 37oC for 45 minutes.
2.) When the digestion is complete, prepare to load the gel. In a new tube, place 17.0 ul of H2O and 3.0 ul of uncut plasmid DNA. Add 2.0 ul dye to each of the three sample tubes (DNA markers, uncut plasmid, and digested plasmid). Load 20.0 ul of DNA marker in to one well of the gel. Do this by sucking the solution into the pipet tip, placing the tip in the top of the well, and gently expelling the liquid into the well. The dye buffer in the DNA marker and samples contains glycerol which makes it more dense than H2O. This will cause the liquid to sink to the bottom of the well. Load 20.0 ul of the uncut plasmid and the restriction digestion.
3.) Turn on the power supply and electrophorese the samples at 110 V (Warning- be careful of the high voltage or you will be set down on your butt dramatically.) Electrophorese the samples until the dark blue dye is about 2 cm from the bottom of the gel
4.) Stain the gel by incubating it for 8 min in an ethidium bromide solution.
WARNING!
Ethidium bromide is very carcinogenic. Handle this gel only while wearing gloves. Never put unprotected fingers in the gel buffer solution.
5.) I will move the gel onto the U.V. trans illuminator and take a picture of it.
6.) I will denature the ethidium bromide by placing the gel in potassium permanganate solution for 5 minutes, then discard it.
Calculations:
On a piece of semi-log graph paper, plot the log of the molecular weight each standard vs. distance traveled from the well (based on measurements made from the picture of the gel). The sizes of the molecular weight standards may be different than in figure 2 and will be given to you during lab. Draw a line connecting the points (although the line won't be linear). From this you should be able to determine the molecular size of the linearized plasmid. Note the difference between the way the linearized DNA ran and the way the uncut plasmid appears. If you have multiple bands in the digested plasmid lane, see if some of them are of the same size as bands in the uncut lane; you may have incomplete digestion of your plasmid due to a sub-optimal purification (i.e., a dirty plasmid prep). Since each of the vector plasmids (without the insert) is 3.0 kb, you can determine the size of the insert in your plasmid by subtracting 3.0 from the size estimated from the gel.
1 comment:
Rotary Evaporator
Post a Comment